Discontinued
OEM / Factory Stripes, Logos and Decals.
Custom
Fabrication for Toyota Trucks and 4Runners.
Motorcycle/Auto decals, logos and pin striping.
NEW POLICY - DUE TO RISING
PRINT COSTS AND INCORRECT ORDERS
THERE ARE NO RETURNS, REFUNDS OR EXCHANGES ON STRIPES, DECALS AND LOGOS.
Please check and confirm accuracy (style,
side and color) of your order at the time of placement. Stripes are produced at
the time of order and thus considered special orders. If you are unsure about
what to order, please contact me ahead of time to verify your needs.
Orders must be confirmed for damage, completeness and correctness within 48
hours of receipt or YOU ARE ON YOUR OWN.
CURRENT PRODUCTION TIME IS
ABOUT 3-4 WEEKS. SORRY FOR THE DELAY.
Items in stock may ship sooner, usually 3-5
days.
93 4Runner Project Build*
I've been searching for an older truck or
4Runner I could fix up and display my factory replacement graphics on. As
most know it's hard to find an older truck and even more difficult to find an
older 4Runner that someone is selling that
doesn't have something major wrong
with it. That's because if you have a good Toyota, you keep a good Toyota.
My quest was finally fulfilled thanks to a Service Writer at
Desert Toyota who was
selling a 93 4Runner. She bought it 3 years ago with a blown motor and put
in a factory short block, along with multiple other parts and services to get it
road worthy. The new motor has 50,000 miles now (just a baby).
Hopefully a good starting point for the JDC "4Runner Project Build".
I'm going to be fixing the minor dents and dings and then re-painting it.
Fix a few other things and make some changes and upgrades. Below you will
see the changes along with tips I found or used to accomplish my transformation.
I hope this will give you ideas and answers on and for changes to your ride.
I also list part #s I used for all my changes.
Click on Images below to take
you to the repair, mod or upgrade.
Suspension Changes
My first order of business was to correct
the ever famous sagging suspension, especially in the rear. I didn't want
to do a full 4" lift with a kit or a SAS, I just wanted a more rugged,
beefier stance. Plus have more load capacity.
I
ordered Old
Man Emu's Torsion Bars and 901 Heavy Duty rear coils springs from
4X4 Connection.
The coils give 1.5" of lift and add 350lbs. load capacity over the factory coils. Upon realizing the 3.5" lift the new coils springs provided over the worn out
originals, I then ordered 1.5" Upper Control Arm Spacers from
4Crawler Offroad to put in at the same time as the new OME torsion Bars.
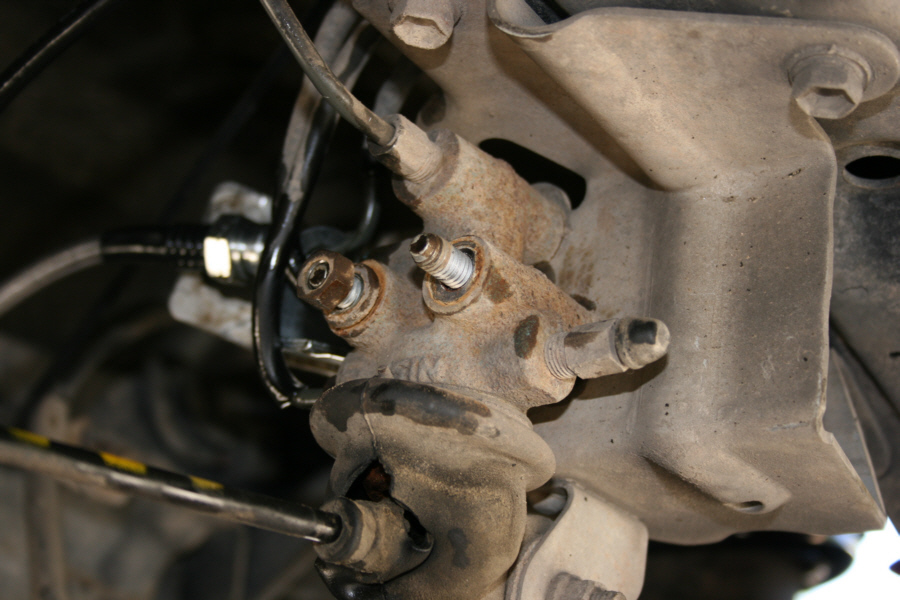
I didn't want to achieve my front lift by cranking up the torsion bars. I found the easiest way to R & R the passenger side torsion bar, was to remove
the front skid plate and slide the bar forward out the front, between the
steering linkage and the
steering stabilizer. The driver side comes out with little problems out
the back. Be prepared for the torsion bar adjusting bolts to break.
Despite spraying with lubricants for 3 days previous, mine snapped after about
10 turns. Toyota part #s: Bolt 90101-12159, Nut 90179-12074. I
figured it wouldn't hurt to have new bolts anyway. I applied anti-seize on
all threads and pivot points to prevent breakage again. Both companies
(4X4 Connection and 4Crawler Offroad) response and help to my order and questions was awesome.
Parts shipped and arrived as promised, one of my biggest pet peeves.
Nothing worse than being told something is in stock, but they meant in China.
To help correct the offset rear end is a
panhard bar drop bracket from
4Crawler Offroad. I had a 5" difference between my frame mount and axle mount for the bar, so a 4"
drop bracket should correct the majority of my offset. I fabricated a
bracket to reposition the rear brake proportioning sensor arm up the 2" to bring
it back to the stock ride height position for more accurate braking. I immediately noticed a difference to a
more even stop instead of the previous dive
the front used to make. I plan on making a new adjustable panhard bar to
finish correcting the 3/8" offset of my rear end. It's hard to do a proper
4wheel alignment with the back off center.
I was able to achieve 15.75" clearance
from rim to wheel well up front and 15" from rim to wheel well in the back.
Easily 1.5" - 2" higher than when it was new on the lot. The ride although
a little stiffer, is still smooth with better handling than with the worn out
original springs and bars. I was able to get the torsion bars, springs,
spacers and drop bracket including S&H for under $500.
If your not looking to go all out with true 33" or bigger
tires requiring gear changes and the sort, this 2" lift option for that beefier
stance can be accomplished for around $700 including everything listed above and
longer shocks.
After my even, beefy stance was achieved with my lift I
worried about what added weight with gear and towing would do for my look.
So back to Desert Rat for a pair of Air Lift Air Bags. Part # 60812 is supposed to give 1000lbs. of
leveling lift. Although this job can be done with one person, Jerry from
ProLine Graphics
dropped by to
assist me. After disconnecting the shocks, brake lines, upper links, sway
bar and
Panhard Bar the coil springs slid out for the bag install. A little soap
on the bags makes for a easy install into the coils. After drilling and deburring a 3/4" hole in the
center of the perch for the airline, the install was no different
than the removal, only backwards. I ran the lines up the lower link to the frame mount for
the Schrader valve, a temp location till I install a air pump, tank and control
system. With the max of 35lbs in the bags they gave me almost an inch of lift
with no apparent effect on ride quality or feel. Score!
Everyone tells you that most shocks are good for up to 1-2"
of lift depending on the manufacture. The only problem is if your shock
only has 4" of travel and you lift your ride 1.5" you are now extended to the
end of you shocks travel. This may be fine when you hit bumps and compress
your shocks, but when your wheels drop out, your shock is getting ripped in half
every time it hits the top of the reservoir. A little research can provide
a shock that has enough length difference, to put you back towards the center of
the stroke. The front shocks* can be replaced with shocks from a
99-2005 Ford F250-350 2WD Super Duty. I used
Rancho
5000's (Part# RS5272). The shock is .625" longer compressed and 1.625"
longer extended, a perfect replacement for my 1.5" spacer lift. The RS5272
has a 1/2" stud at the top and a 5/8" bushing for the lower mount. The
bushing is a little thinner than the stock shock, so it may require a washer on
each side of the bushing. Also there is no sleeve in the bushing, so I
would recommend changing the regular nut to a locking nut so you don't have to
crank down on the bolt. The rear shocks* can be replaced with shocks from a 95-96
Lexus LX450. I used
Rancho 5000's (Part# RS5208). It has the same
lower mount and a stud for the top. Although it has 1/2" threads on
the stud end, the hole
in the frame is large enough. The shock is 1" longer compressed and 1.75"
longer extended, a perfect replacement for a 1.5" lift. Because the
stud is larger on both front and rear new shocks, make sure the grommet flange
gets centered in frame hole. I chose to
use Rancho shocks because I liked the ride I had with the stock length Rancho
shocks and the cost. I would assume any manufactures shocks for the above
listed applications would work. I replaced the lower bump stops up front with
Energy Suspensions
9.9101 2.125" tall bump stop to limit upward travel. Don't forget,
there is a set on the front and rear of the lower control arms. Since the upper
control arms sits pretty much in the stock position I left the factory bump stop. I got my shocks
and bump stops from the great guys at
Desert Rat Offroad.
* You must have at least 1.5" of suspension lift to use
these shocks. Not having that lift puts your shocks at the bottom of compression
stroke which is as bad if not worse than being extended.
Extended Brake Lines
In conjunction with my lift, small as it may be, I noticed
the brake lines having an issue (being too short), mainly the rear. To the net I
went. Although may companies list extended lines, I got mine from
Trail Gear. When I
opened the box they came in, I was amazed at the beauty and quality. Stainless
steel braided lines covered in clear with billet ends. A definite upgrade in
looks and performance. As you can see in the pics below the originals are just
too short. Even in the sitting position they are barely long enough.
First remove old brake line. Then remove the
nuts that hold the proportioning valve in place and slide bracket out. Cut angle
tab off, clean up cut and drill hole for new brake line restraint. Insert a
5/16" X 3/4" bolt to hold new bracket. Re-install bracket. Finish off by
installing new brake line. I looped my line so as to not rub on any body or
suspension parts. Of coarse you will need to bleed and add brake fluid.
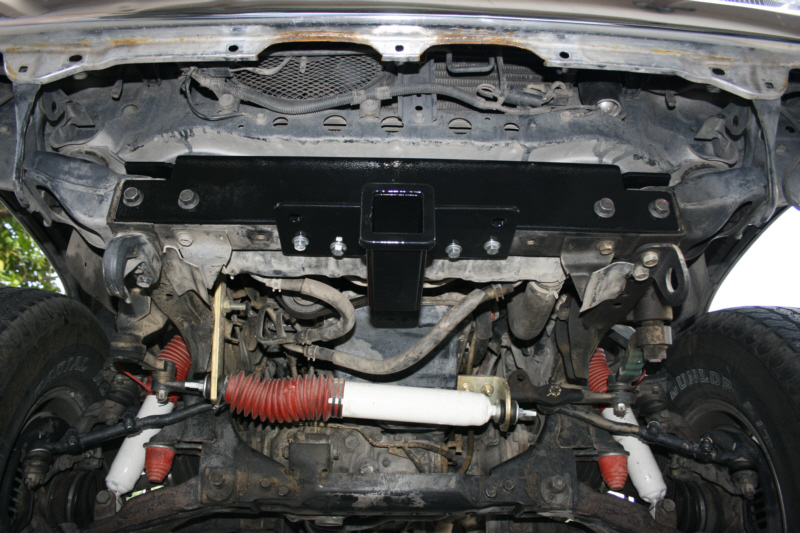
Onboard Air
The heart of my on-board air
system is two Viair 480c
pump and 2.5 gallon tank from
Arnott Air Products.
This feeds to a Firestone pneumatic controller and gauge thru 1/4" airlines and
compression fittings provided by
Michigan Truck Spring.
I cut a second hole for a tank pressure gauge in addition to my bag psi gauge.
This allows me to have both control over my air bags in my coil springs for ride
height and leveling, as well as to have a quick release fitting on both sides of
my ride for tire filling after crawling. The combination of a 100% duty
cycle pump at 100psi and a 2.5 gallon tank makes quick time out of returning my
31s to road pressure after crawlin or filling my Zodiac in San Carlos. This also
provides me with more than enough air if and when I install lockers.
I had to make 1.5" spacers for my spare tire locating brackets to
allow for the size of my air tank. I also cut 1" of the stirrup mount to get my
tank as flush to the floor of my truck. I used long reach 1/4-20 quick
nuts instead of the bushing, bolt and nut combo provided, due to the restricted
access when the tank was in place. This made for a easy install by running a
3/4" stainless screw from the inside down into the quick nuts.
For several reasons I've decided to switch
from my ADD (Auto Differential Disconnect) factory hubs to a set of
Warn Premium
Hubs (Part# 28761). First, it saves your CV joints and boots by not turning all the
time, especially with a lifted vehicle it puts a greater angle and stress on
them. Second, if anything up front breaks on the trail, you can unlock for
the drive home, instead of the tow truck ride home. Third and most
debatable, I'm hoping for a little more efficiency and power on the street.
The later will be tested and results shared after install (I've kept close
track of mileage before swap). You will need Spindle Nut Conversion kit
(Part# 29918) if you have Auto Hubs, but you will NOT need it if you have
ADD.
Toyota switched from Auto Hubs to ADD hubs
in 89 for trucks and 90 for 4Runners. This was great since the whole "back
up on the trail" thing and you were not in 4wheel drive anymore with the
Auto Hubs sucked. However, with ADD, your whole front axle, diff and front
driveline, all turn, all the time. Can't help to think there's a little
drag there. Just remember to drive in 4Wheel drive at least once a month
to keep everything up front lubricated.
Although you don't need to take the wheels
off, I did anyway. Remove dust cup, then axle bolt and spacer (washer),
next remove acorn nuts and locking cones and drive flange. Install Manuel
hub base with washers and acorn nuts and tighten to specs. Replace axle
bolt and washer. Install hub cap assemble with gasket in correct place and
tighten socket cap screws. Verify that your hubs engage and disengage.
The whole job to me less than 30 minutes including taking the pictures.
This project cost about $130 and 30
minutes of time with no specialty tools (hammer, flat blade, 12mm socket and 4
mm allen). I anticipate recovering that amount in economy, performance and
less cost from wear and tear.
Update - I have since checked my
mileage and have noticed a difference. I have gained between 1-2 miles per
gallon better and a less sluggish, easier roll with the manual hubs
unlocked. Not to say this will be true in your case, but like a stated
previous, I can't imagine that there isn't some resistance in a front end that
is all under load. Considering I have a V6, Auto with larger tires and a lot of
extra weight (Hi-Lift jack, tool box, custom rack, front receiver, air tank and
compressor) I get 15 mpg in town with a drop by a mile or two running the A/C.
JDC Front Bumper Mods and 2" Receiver
Since my lower front bumper valence was
damaged when I got my 4Runner, I decided to remove it and make a custom one that
included a 2" receiver. I believe the metal upper bumper looks fine from
the side without the lower valence, so my build will just be in the center
section up front. This will provide extra tire clearance and greater
inclination angle.
The receiver bracket mounts to the frame where the
bumper push rings normally bolt to and 6 other pre-existing threaded holes and 2
non-threaded holes in the frame. Yes a total of 10 mounting locations.
The front receiver is positioned at the same height that the rear factory
receiver is. This bracket
is made from 1/4" steel and has a 2" receiver hitch
and reinforcement gussets with link holes. More than enough for forward boat
launches, towing or a wench cradle (see below). Comes
in either bare metal or
black powder coat finish. Trimming a 1/4" off the top of the skip
plate in the center and a notch for the receiver is required for the receiver
bracket to clear on IFS models. Trimming a notch from the center of the factory
plastic valance (if used) is also required. Receiver comes with all mounting
bolts and template to cut skid plate (IFS models).
Use of this receiver requires adding
a Transmission cooler on automatic trucks and 4Runners.
The valance mounts to the bumper where the old
plastic one originally mounted. Drilled holes for greater cooling and looks.
This new valance stays in the center of the upper bumper and does not wrap
around the sides. This provides more approach angle as well as more tire
clearance. Valance is made from 1/8" steel and is black powder coated.
This 2" receiver fits the front of 90-95 4Runners and 89-95 4X4 trucks.
(Receiver pictured below without valance to show design and mounting)
This valance fits 2nd Generation 4Runners 90-95 with bumper style shown
below.
(Requires removing oem plastic valance and trimming license tabs.)
Although
2" receiver was tested to 500lbs, it is rated for 300lb static load. For light duty hitch, tow strap
or winch use.
Four Link Solutions
When a four link suspension gets moved from its original
stance location with a lift or a drop, it will usually change the pinion angle.
This is true in the case of the 4Runners with coil springs. When the rear
end is pushed down with taller springs, it moves the differential forward and
rotate the pinion angle up. This can only truly be corrected by
lengthening the lower links. Changing the upper links with longer or adjustable
will move the wheel back to center, but will make pinion angle worse. And
you definitely don't want to shorten the upper links without lengthening the
lowers, this will push your driveline further into your tranny. Remember
opposing u-joints have to be equal and opposite angles. Even a lift as
small as 1.5" can change the pinion angle by 2 degrees. After I lifted my
4Runner with OME's HD coil springs I noticed an elliptical vibration starting in
my drive shaft. (For a more detailed write up see
http://www.4x4wire.com/toyota/tech/driveline/) This is because the
front u-joint angle is 4 degrees and my pinion angle was -2 degrees. Changing
the lengths of your links can cause problems when your suspension is compressed
or dropped (oversized tires may rub or bind) but this procedure will correct
street driving and 90 percent of wheel travel situations.
JDC Poor
Mans Rear Lower
Link Extension Kit
Instead of making or buying longer lower links
you can
lengthen your current ones. After measuring the diameter of my link I found
that 1.75" DOM tubing with a wall of .188" would sleeve the factory link
perfectly. After removing my driveshaft and putting the 4Runner on jack
stands, I disconnected the lower links and rotated the rear end till the back of
the tranny and the front of the pinion were equal and opposite angles.
With my 1.5" lift the lower link needed to be lengthened by a 1/2". (With a 4"
lift, it needs to be lengthened by 1".) After cutting your link and
extending to the corrected length, mig welded the sleeve at each end and
re-installed. Not only will this get rid of the vibration, it will
relocate your axle back to its correct position in the wheel well and extend the
life of your u-joints. This method should only be done if your tires (i.e.. 33
plus) will not bind or rub when your rear end is compressed.
JDC Heavy Duty Wench Cradle
Custom heavy duty wench cradle with built in block and
tackle attachment point. Most wench cradles don't have an
attachment point or hook on the cradle, which forces you to hook to an
existing offset front end hook or the frame if you need to run the line back for
extra pull. This can put an unusual amount of sideways twist on
your cradle. Most can't handle it. The JDC cradle extends
the 2" receiver all the way to the front of the cradle so as to
put an attachment point directly below and inline with your wench.
JDC Heavy Duty Safari Basket Roof Rack
(with optional Hi-Lift Jack mount, Light Tabs
and Tool Mount)
With my main goal of creating a beefy,
off-road looking vehicle, the realization that the stock jack would no longer
reach any ware under the 4Runner and be able to change a tire, I got a Hi-Lift
HL485 Extreme Jack. The only problem is where to put a 4' long jack. After
removing the factory cross bars I made a basket rack the will hold my jack on
one side and some leverage bars, shovel or pick on the other side. Made from 16
gauge 1" square tubing provides plenty of strength while remaining light weight.
The bottom has 3 support cross-bars and is decked with 1/2 expanded metal. This rack is available for purchase with
different options and accessories.
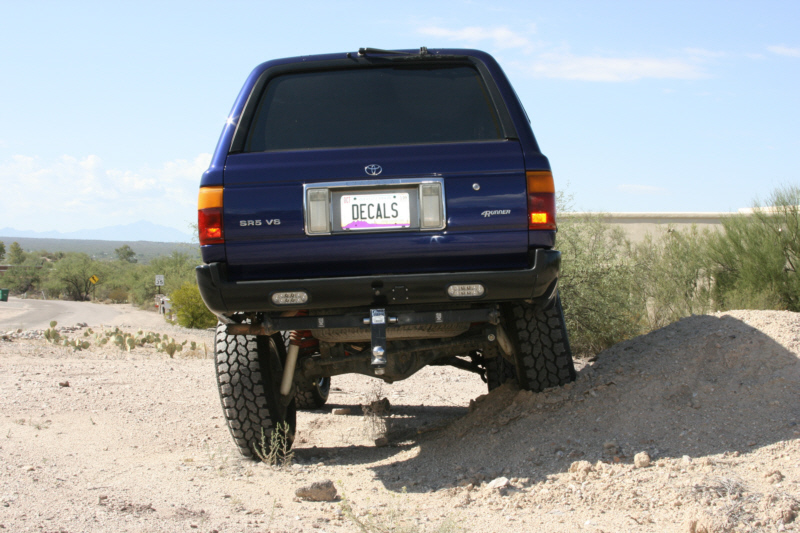
Rear Bumper Lights
As most are aware the rear
back-up lights on the 2nd Generation 4Runners don't provide that much light,
especially if your vehicle is lifted. So I thought I would add a little extra by
inserting some white LED lights into the rear bumper. I didn't want to
mount lights below the bumper because experience has shown me they usually get
broken or twisted. Now granted, these
don't provide the amount of light an off-road or KC light would, but the give
off a cleaner and brighter light than the ones that are higher in the tailgate.
They are also aimed down just a little because of the angle of the bumper. The
lights I chose are from a trailer / truck supplier.
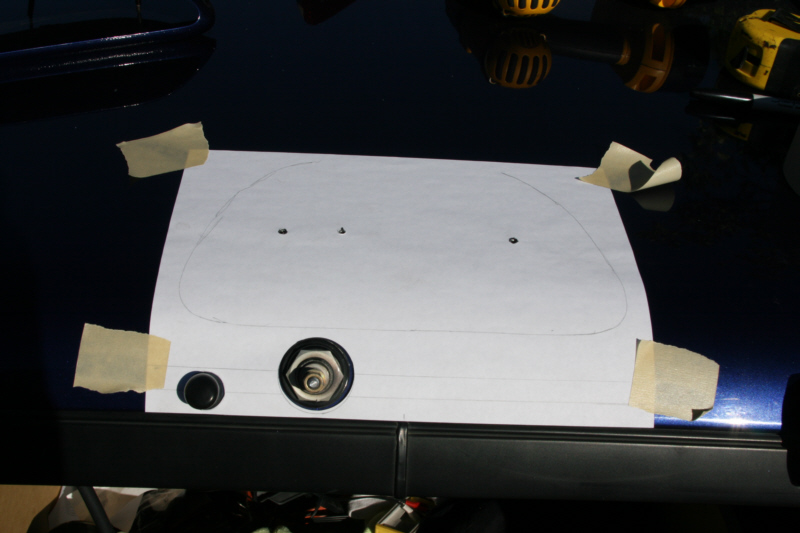
I started by finding the area behind the bumper
where the "Y" mounting bracket would allow for the back of the light to fit.
Then I made paper template from the mounting bracket that came with the light.
Cut the opening with a die grinder and cleaned up the radius with a rotary
grinder. After the hole was cut I inserted the rubber trim ring and then the
light. Since these are LED's and have very little draw I was able to tie in
directly to my reverse lights. These lights also help light the area for my
backup camera which is mounted in the middle of my bumper just under the spare
tire crank hole ( not in these pics). I initially went with the 10 LED version
for cost reasons, however I plan to switch to the much brighter 20 LED version
as soon as I wrangle up the cash. At that time I will move the 10's around to
the sides of the bumper for more side lighting while backing up or night
crawlin.
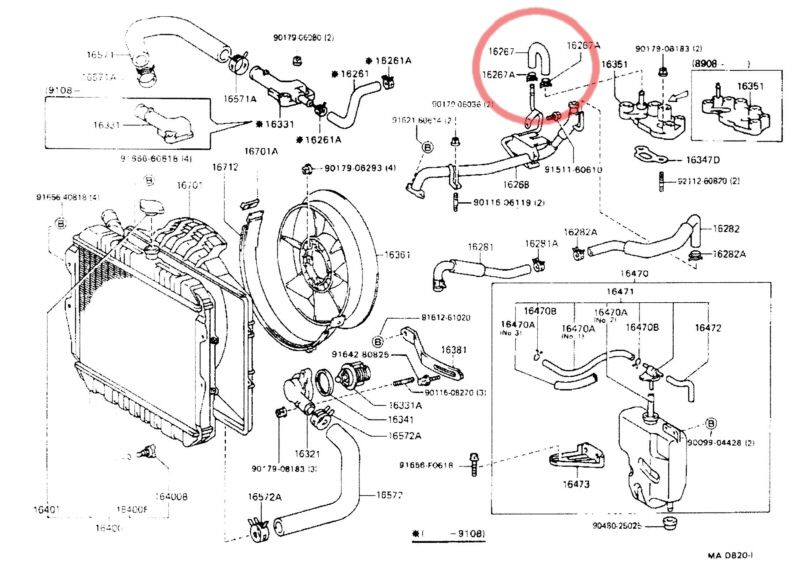
By-Pass hose #3
As most with the 3.0 V6, have had the small cane
shaped by-pass hose at the rear of the motor go bad or will. This is mostly
caused by the hi heat due to the exhaust cross-over tube directly below. Some
after market suppliers may carry this pre-curved hose, but you may find you can
only get it from the dealer in your area. It is part #16267-65011 and list for
around $10. Usually the 2 port thermal switch and vacuum lines next to it are
dried out and corroded too. If you have to replace the by-pass hose you will
probably have to change the thermal switch and lines as well.
First off you will need a pair of long needle nose
pliers. Remove the screw that holds the brake booster vacuum line to the
firewall and carefully rotate hose forward. This will give you more viewing and
working room. Use needle nose pliers to remove spring clamps from hose. You may
need to cut hose at bases to release. Be careful of
the port switch. The ports are plastic and will probably break if they already
aren't. Insert the clamps on the new hose with the handles
facing the passenger side and slightly to the rear. Lube the inside of the hose
with a silicon or vegetable oil to make for an easier slide.
Do Not use petroleum base oil.
Re-install hose and slide clamps into place. Re-install brake booster hose bolt
and check your fluid level.
Remote Oil Filter
As everyone is well aware, most vehicles have the oil filter
in the strangest location and worst angle. This results in contortionist act and
dripping oil everywhere. The 4Runner is no exception. To avoid having to remove
the skid plate and clean up a bunch of oil on every change, I am installing a
remote oil filter kit by Hayden. Part #291. The kit comes with everything you
need except for hose and a PH8 (Ford) filter. The hose and added filter size
will increase oil capacity and hopefully a lower oil temperature.
I made an oval hole in the inner fender well just above the
lips. I ran both hoses inside a radiator hose to protect them from the fender as
well as the frame edge under the P/S gearbox. I still have some minor
adjustments to make as well as a shield to protect the filter from debris.
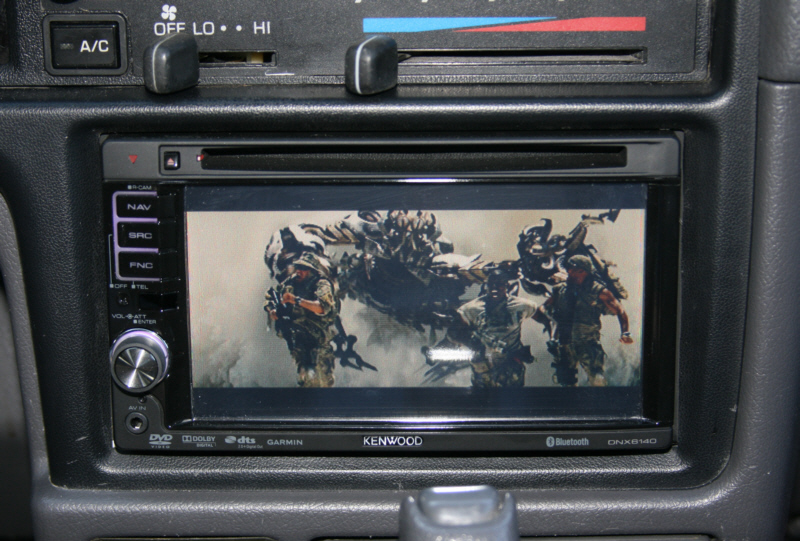
Audio / Video / Dual Battery /
Air Pump
I decided to go with a Pioneer AVIC-F90BT double din head unit for my
audio/video needs. I loved the deck and features till they all failed one
at a time making my HU a double din brick. With no fixes in the works from
Pioneer on this particular unit, and them being backordered from all the
warranties, I decided to go back to my first choice of a Kenwood. The
Kenwood DNX6140 is a relatively new upgrade from the 5120. It has Radio
Tuner, Garmin Nav, DVD/CD, Bluetooth (HFP/Connectivity), USB, iPod, Video input and back-up camera ability built in.
It comes ready for HD, Sirius and XM Tuner. I tied into the reverse wire
behind the ECM brain on passenger side kick panel for the automatic reverse
camera view switching wire. The white LED reverse lights installed in the
rear bumper (mentioned above) help with illuminating those nighttime backups.
An Omega 135 degree, .7 LUX reverse camera mounted center in the rear bumper
provides the source. This camera works great for backing up to my trailer
or to make sure no objects are behind you. A second standard angle camera
is mounted in the rear of my safari rack for load watching while towing (or if a
cute girl is behind you). Since my truck was all apart from a color change
paint job, most of the installation was easier because the interior panels were
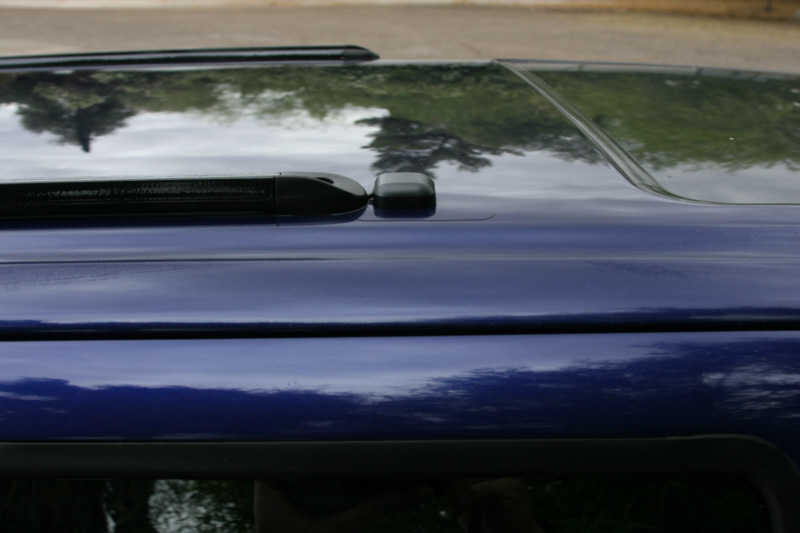
already removed. This allowed me to place my GPS antenna on the roof in
front of my roof rack foot for that stealth look. First I installed a
urethane paint protection film where the antenna would sit in front of the rail,
then I drilled a hole under the removed foot, ran the antenna wire through and
to the head unit. The end cap was then slotted to allow for the wire, a
dollop of silicone was squeezed around the wire and hole and the cab replaced.
My front listening enjoyment comes from 4" component JBL GT.
The main speakers are mounted in the dash in the oem location with the tweeters
being mounted in the pillar post just below the grab handles. These are backed by my rear speakers that are
MB Quartz PVF213. The main driver is mounted in the top of my rear side
boxes, while the tweeters are mounted in the oem tweeter position above the rear
window by the headliner. Lows are produced by a JL Audio 10Wv2 in a ported
enclosure. Full range speakers are driven by a 4 channel Pioneer Amp(GM-6400F),
while the sub is powered by a bridged 2 channel(GM-5400T).
Pictured below are my first built boxes to give me sound /
space / esthetics characteristics. The sub box has 1 cubic foot of air
space with a 3"X11" port (with rounded edges) that fires forward into the amp
chamber. Box has great sound with the ability to produce outstanding bass.
Kudos JL Audio. The Passenger side box houses my second battery (Deep
Cycle with evaporation oil additive to cut down on out-gassing), my main
permanent Viair pump and full range 4 channel amp. I found the boxes to be
about 1" to tall to my liking ( I know I'm anal), so I plan to rebuild them.
Not a fun undertaking since these boxes are built into a floor piece and they
are tapered with the wheel wells so as not to look big when the tailgate is
down. Pencil Lines in first picture are straight and parallel to center
seam. There is a 3" difference from front to rear between the two boxes.
After the boxes are rebuilt I will trim the rear interior quarter trim panels to
mate to tops of boxes to give that oem/custom look.
Leaving the front battery is a 2/0 cable that is controlled
by a Cole Hersee constant/heavy duty solenoid which continues to the rear Deep
Cycle battery. All cable ends are fitted with crimp terminals and adhesive
sealed shrink tube. Solenoid can be switched on, off or with ignition.
This allows for chillin all day listening to the tunes or showing a slide show
at a car/truck show without affecting your starting/engine battery. The
standard position is on with the ignition, allowing for charging of rear battery
while engine is running. If rear battery is depleted, solenoid can be
turned off for engine starting without putting a drain on the system. If
front battery gets drained or has a problem the solenoid can be turned on for
engine starting and/or power.
After building a tray that would hold my Deep Cycle battery
from General Power and my ViAir pump, I mounted it to the floor with 1/4"X20
Rivnuts and tapered head machine screws. Predrilled holes in the tray will allow
for a HD hold down strap to keep that juice in place during those bouncy rides.
Custom Body & Paint Work
Well I finally broke down
and started the tedious process of my body work and paint. I like the color that
comes on the Lexus IS300, code 8N8. I took that formula and quadrupled the
violet toner in it to help kill the green cast and bring it around to more of a
purple color. I think this will create a beautiful canvas to install my
silver oem replacement stripes on.
Although I do this type of work all the time, I
haled a close personal friend and DuPont certified paint specialist, Don
Sorensen, from Oregon to come down to assist me. This was mainly to lesson my
down time, but he's also really good at what he does. We started by washing and
degreasing the 4Runner so as to see what would be required and to remove any
contaminates. Then we marked all areas that required body work. After that we
de-trimmed bumpers, wheel well moldings, windows, lights, rack, handles, emblems
and grill.
Most areas only had minor damage (i.e. door dings and
ripples) so body work areas only needed to be hit with 80 grit to prep for glazing putty.
Filler was then hand blocked with 80 grit, then finished off with 150. The rest of the
4Runner was then blocked with 150 grit to prepare for the sprayable polyester
filler. All window and other openings were masked to prevent primer from getting
on anything not intended. After a day or two a drying, the ride was hand blocked with 150 to
insure straight panels.
Now the Runner gets re-masked and primed with regular filling
primer. The final light coat gets some color added for a guide coat. This let's
you know you have missed any spots when you sand. This primer will get blocked with 400 grit paper and will then be ready
to paint.
With the paint being such a good covering color, painting the
pieces separately wasn't going to be a problem. This allowed for the jams and
insides of the doors and tailgate to be painted fully without any masking lines.
All panels, inside and out were sealed with a grey sealer. Then 3-4 coats of
base were sprayed out for coverage. This was then lightly sanded with 800 to
knock down any imperfections or peaks in the sealer or base. Then a slightly
over-reduced base was applied to melt in sand marks and eliminate any mottling.
The base was now ready for clear. Du Pont's G2 Multi-Mix clear lays out beautifully and sets up quick, even
without force drying. After they had a chance to dry, the hood, doors and
tailgate were carefully re-installed. Then it was blocked with 800 grit and re-cleared.
This re-clear is not a necessary step, but I wanted a deep shine and extra
protection. This step makes the cut and buff easier because the clear is already
pretty smooth with very little imperfections. This will also allow for minor scratches to by color sanded and
buffed out later without the fear of busting through. Here are the pics after
the re-clear but before the cut and buff. DuPont certified painter Don Sorensen
on the left and myself on the right. My Cheshire cat grin knowing that my baby
is finally painted.
With the panels all re-cleared the color sanding and buffing
was done on the sides and hood. This was done before the windows and handles
were installed to prevent buffing compound from damaging the gaskets. After the
side windows were installed, the new windshield was urethaned in by Robert from
Roadrunner
Auto Glass. Their office girl Cindy took care of my entire windshield glass
claim including getting me new moldings. Thanks Roadrunner. After the
windshield was installed, the roof was cut and buffed then off to the tint shop
it went to have new limo in the back and legal up front laid on. The top of the
windshield is going to get a color matched vinyl strip. While all the interior
trim was off, I also installed Quiet-Pads on all the doors, quarter panels and
tailgate. They are a peel and stick pad that is about 1/8" thick. I had scrubbed
the inside panels really well while prepping the doors for paint, so all I had
to do on install is clean with alcohol. This gives amazing sound deadening as
well stiffening up the panels.
Since my chrome bumpers had some damage (minor dents and
dings) I figured I would hammer and dolly them out and powder coat them hammer
tone black. After the dents were fixed we ran a 80 grit pad over the chrome to
rough the surface for better adhesion being careful not to bust through the
chrome anywhere. This textured black finish gives it a tougher stance plus hides
the minor imperfections of the repairs. Joe at Tucson Spraying Technologies did
a beautiful job basing and clear coating the finish. After finding a bracket
from a salvage yard to replace one of my rear brackets that was bent (and not
replaced) from a previous repair, Don and I installed the new bracket and
bumpers.
The next step is the main reason I bought a Toyota, to display my reproduction
factory graphics. After the final cut and buff, the stripes went on. I used an
1/8" guideline tape to insure panel alignment of the stripes. This is crucial on
this model of 4Runner because none of the body lines line up with each other. I
also installed some body side molding for looks and added protection from
inconsiderate. The last pic is to show I'm still willing to use my 4Runner and
have fun with it. Combination of 4 wheelin on muddy roads the night before and
some snow during the day.
Wheels, Tires and Bushwacker Fender Flares
I have finally just about wore down the tires that came on my
4Runner when I bought it. So some new shoes and socks are going on soon. I like
the new ProComp Extreme A/T's. They have a look between All Terrains and a Mud
tire. They also have a 40,000 mile tread warranty. Their 265/75/16 comes in a LT
with a load rating of E. Think I'll wrap them around some ProComp Polished 16X8
1089's. With the tires riding at 31.6" (instead of 29.5") it should fill in
those wheels wells better, give me a little boost over them rocks and not put
too much of an extra load on my motor. All in all, I think it will be a
good combo with the 1.5-2" lift I have.
After my new wheels and tires were mounted, it was definitely time to install my
Bushwacker fender
flares that I had bought a year ago.
The next step was fitting my
. Although there fit was pretty good, there are always minor things that
need to be trimmed from the edges to insure a fug snit. First order of business
was to hold them in place to see where to trim.
A 1/2" wide strip of 3M Urethane Paint Protection film was installed where the
flare makes contact with the vehicle to protect the paint.
After trimming, they were prepped for paint. A few
coats of DuPont black basecoat and 2 coats of G2 clear finish them off making them
almost ready for their install. After applying the edge molding supplied with
the flares, they were final installed.
3rd Brake Light
Since the 3rd brake light wasn't standard till 94 and I tow on a regular basis I
thought the addition of a 3rd brake light would be a good safety addition. I
found a member of YotaTech that had purchased a wrecked 95 from a used car lot
that had a good brake light. He was kind enough to sell it with the wiring. It
was green so I had to paint it to match, no problem there. I made a paper
template to locate the holes for the two mounts and 3rd for the wire harness.
After re-gluing the rubber seal in place and putting some RTV sealant around the
bolt holes I set the brake light in place and tightened it down. Fortunately the
93 4Runner came with the 3rd brake light plug already in the harness, so all I
needed to do was plug it in. The addition of a 3rd brake light on my 93 was
complete. All that is left is to trim my rear air deflector to allow for
clearence.
Washer Pumps and Seals
I was told when I bought the 4Runner that
the windshield washer pump was bad and that the Toyota part was $240. So I
bought a Trico replacement pump for $33 from
Checker Auto. When I
went to change the pump, I tested it first, only to realize the pump was fine, it
was unplugged and the rubber grommets leaked like a sieve. I found that a
5/8 - 7/8 grommet made the same seal the factory sleeve did.
I used a little o-ring lube to help the pumps slide in without breaking the 14
year old bottle. Replaced both grommets for under $1 and both pumps work great again.
Needless to say I returned the $33 pump.
Before testing those pumps out make sure
all of your wipers are good. They will come on when you squirt the pumps.
Most aftermarket parts stores don't have a listing for the rear wiper, but if
your arm is good shape Toyota makes a slide in replacement blade(A350).
Part # 85221-YZZA2.
Rear View Mirror
As with most Toyotas with the "break away"
rear view mirror, they get loose and floppy at the mount point. This is
not only irritating but makes it difficult to keep the mirror adjusted.
Unless something is broke on your truck, the looseness is easily remedied with a
#2 Phillips and an awl. It is caused by the two tension pins that allow
for the "breakaway mechanism" getting compressed over time. It
is a simple 10-15 minute fix.
Remove cover on mirror base and remove the 4 screws that hold it to the roof.
Remove the single screw and T-mount that holds the mirror arm to the base.
Remove the tension pins out of the base (look like mini bear traps).
Spread the pins apart slightly from both directions with an awl till the teeth
are about 1/16" apart.
Place pins back into base and replace mirror arm back on base with the T-mount
and screw.
Put mirror assembly back in place with the 4 screws and replace cover.
This should fix your floppy, bouncing
mirror. Unless part of your mount is actually broke, then off to the junk
yard you go.
Modification List
Old Man Emu's 901 Heavy Load (350lbs.) Rear Coil Springs.
Air Ride 1000lb leveling air bags in rear coils. Part# 60812.
Dual Viair 480C air compressor and 2.5 gallon air tank.
Firestone pneumatic controller and psi gauge.
Old Man Emu's 303003 Heavy Duty Torsion Bars.
San Diego Off Road Innovations 1.5" Ball Joint Spacer.
4Crawler 4" Panhard Bar Drop Bracket.
JDC Brake Proportioning Valve Relocation bracket.
Extended Brake lines by Trail Gear Inc.
Dual Battery system with Constant/Heavy Duty
control solenoid.
Power quick connects front
and rear.
Rancho RS5272 Front Shocks. 1.625" longer than stock.
Rancho RS5208 Rear Shocks. 1.75" longer than stock.
Energy Suspension 9.9101 Bump Stop. 2.125"
Warn Premium Manual Hubs. Part# 28761
JDC Front lower bumper w/2" Receiver and
Quick-links.
JDC Safari Rack with KC lights and Hi-Lift Jack
mounts.
JDC Extreme duty adjustable lower link arms.
JDC lower front bumper valance.
Custom paint job (color change including
jams).
Powder coated bumpers (black hammer tone
w/clear).
JDC Replacement Factory graphics.
Body side moldings.
Clear Bra (Paint Protection Film).
Transmission cooler.
Oil filter relocation kit.
LED backup lights in rear bumper.
Hi Lift HL-485 Extreme Jack.
Eclipse Sunshade.
Kenwood DNX-6140 A/V unit.
Two Pioneer GM series amps.
JL Audio 10Wv2 sub.
Rear back-up camera.
In The Works
Bushwacker Fender flares.
Future Mods
Air lockers (front and rear).
Custom Sliders (steps / sliders).
Remote start/alarm.
* The information listed in this build are items and ideas I
found that worked for me. Any alterations you make are done at your own risk and
should be calculated and double checked to fit your needs.
Send mail to
james@jamesdeancreations.com with questions
or comments about this web site. Site best viewed at 1024 X 768
Last modified:
11/21/20